How To Write Meta Part 2: A Step-By-Step Guide For Uploading
August 27, 2024 - Sydney
August 27, 2024 - Sydney
Meta titles and meta descriptions form the foundation of a well-optimized website, playing a crucial role in how search engines understand and rank your content. Optimizing these elements enhances your website’s visibility and aid in attracting the right audience. In our previous blog post, Meta Titles & Meta Descriptions For Beginners, we walked through what meta titles and meta descriptions are and provided tips on how to write them effectively.
At Solution, we most often work with WordPress and Shopify when it comes to website hosting platforms. On these platforms, we can access the website’s backend, which is where changes to pages or products are made, including changes to the meta title, meta description, link title tags, alt tags for images, header tags, and more. This blog will walk through the steps of accessing each platform’s backend and where to upload meta titles and meta descriptions, giving you complete control over your website’s optimization.
Shopify is an e-commerce platform that allows individuals and businesses to create and manage online stores. It offers storefront customization, product management, payment processing, built-in SEO tools, order management, and more.
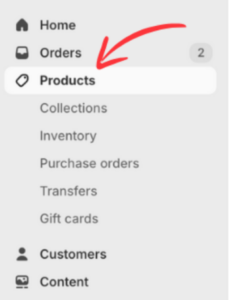
For this example, we will upload the meta title and meta description of a Stanley Water Bottle through Shopify.
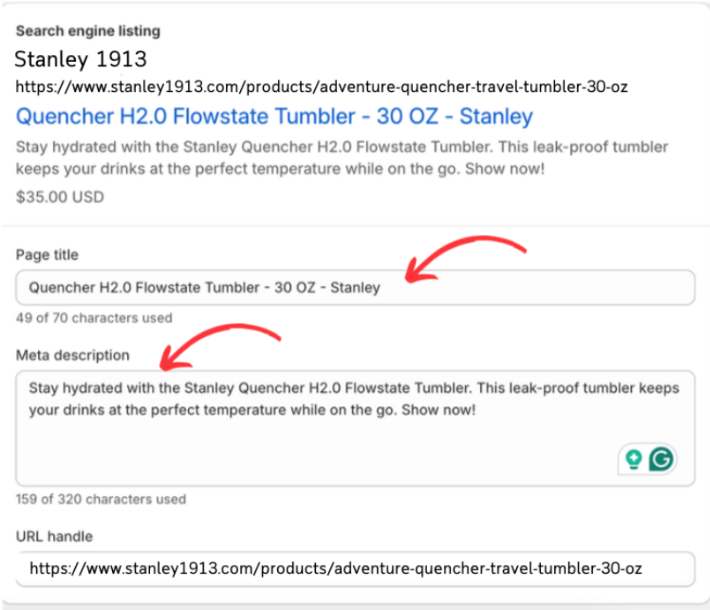
Below is an example of what it looks like to upload an optimized meta title and meta description into Shopify’s backend:
Meta Title: Quencher H2.0 Flowstate Tumbler 30OZ – Stanley 1913
Meta Description: Stay hydrated with the Stanley Quencher H2.0 Flowstate Tumbler. This leak-proof tumbler keeps your drinks at the perfect temperature while on the go. Show now!
Then you are done! Repeat this process for all products and pages that you want to add optimized meta to.

WordPress is a widely used content management system (CMS) for individuals and businesses. WordPress is an accessible platform that provides SEO plugins like Yoast to optimize your site for search engines and improve ranking and visibility.
For this example, we will walk through uploading meta for a previous Solution blog, Meta Titles & Meta Descriptions For Beginners.

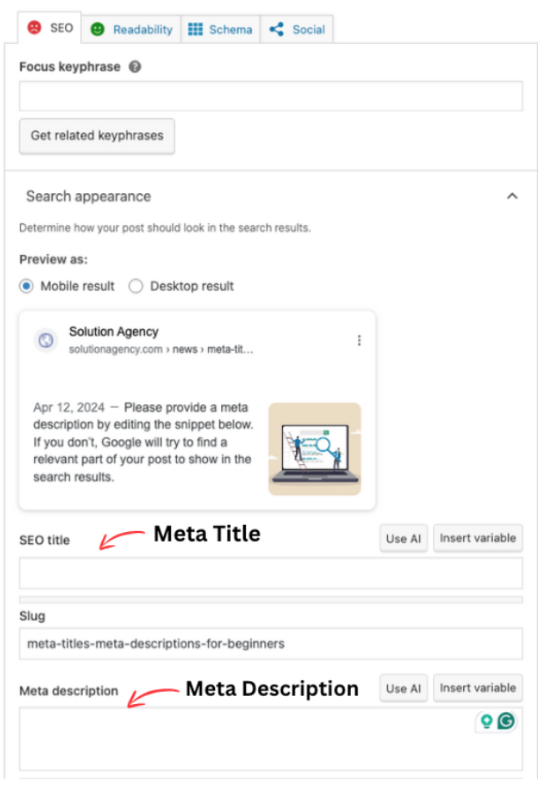
Below is an example of the meta title and description for the blog Meta Titles & Meta Descriptions For Beginners.
Meta Title: Meta Title & Description For Beginners – News – Solution Agency
Meta Description: Our beginner-friendly guide teaches you the basics of meta titles and descriptions. Start maximizing your website optimization with Solution Agency today!
Step 5: After you have added your meta title & description, Click “Update” at the top of the page.
Then you are done! Repeat this process for all products and pages you want to add optimized meta.

Incorporating meta titles and meta descriptions into your website isn’t just a technical task; it’s a strategic move that impacts your online presence. By following the step-by-step instructions for uploading meta to platforms like Shopify and WordPress, you can take control of your website’s optimization, ensuring your content reaches your target audience.
At Solution Agency, we believe in providing the tools and knowledge to help you succeed in the digital space. Now that you’ve mastered the process of uploading and improving meta elements, you’re on your way to enhancing your website’s visibility and performance.
If you want to take the next step in improving your website’s visibility, Solution Agency’s digital marketing experts can help you find a solution. Our inboxes are always open if you have questions about our services. Contact us to get started!